
Showing posts with label MAC. Show all posts
Showing posts with label MAC. Show all posts
Wednesday, February 22, 2012


Monday, November 16, 2009
How to Jailbreak and Unlock iPhone 2G/3G/3GS on 3.1.2 w/ Blackra1n / Blacksn0w: The Guide
Before we begin, please take some time to review the notes below as they are very important:
- The methods listed below can be followed on BOTH PC and Mac users.
- Your iPhone/iPod Touch must be updated to firmware 3.1.2 via iTunes before beginning this process.
- For users that already have a jailbroken device and want to keep their jailbroken apps, before you begin the process below, download “AptBackup” from Cydia and back up your jailbroken apps. Now connect your device to iTunes and backup your device using the iTunes backup process. After you do the jailbreak process below, redownload AptBackup from Cydia and plug your device into your computer. Using AptBackup, restore your apps.
- If you are already jailbroken and/or unlocked and have problems with WiFi, GPS or Youtube, click here.
The following is how to Jailbreak and Unlock the iPhone 3G/3GS on 3.1.2 Firmware
1.) Plug your iPhone into iTunes, do a backup and then click “Update” to install firmware 3.1.2. After the update, eject your iPhone from iTunes using the “eject” button and close iTunes. Leave your iPhone connected to your computer.
2.) Click on the PC or Mac links to download Blackra1n for PC or MAC. Save the file to your computer desktop.
3.) Locate the downloaded file “Blackra1n” and double-click on it. Click on "Make it ra1n" to launch the tool.

4.) Your iPhone will now enter into Recovery Mode. If iTunes opens, simply close it.


5.) After the reboot, Blackra1n will indicate that your iPhone has been jailbroken. Click “OK”. You can also close Blackra1n now if it is still open.
6.) Once at your iPhone home-screen, go to Settings > WiFi and turn on WiFi.
7.) On your iPhone home-screen, you will see a new Blackra1n icon. Tap on it.

8.) When Blackra1n opens, tap on Cydia (or Rock) and tap “Install” in the top right corner.
9.) Cydia (or Rock) will now be visible on your iPhone home-screen. Your iPhone is now Jailbroken.
How to Unlock the iPhone 3G/3GS
1.) On your iPhone home-screen, tap on the Blackra1n icon.
2.) In the Blackra1n app, tap on “Sn0w”. Your iPhone will now be unlocked.

Note: You may go back into the Blackra1n app on your home-screen and use the Uninstall toggle to remove the Blackra1n app from your home-screen. This does not affect the jailbreak or unlock.
---------------------------------------------------------------------------------
The following is how to Unlock the iPhone 3G/3GS if you are already Jailbroken and running Baseband 05.11.07
1.) On your iPhone home-screen, tap on the Cydia icon.
2.) If Cydia prompts you for updates, install them all.
3.) In Cydia, tap on the “Manage” tab at the bottom.

4.) Tap on the “Sources” button.
5.) Tap on the “Edit” button in the top right corner of the screen and then tap the “Add” button in the top left corner.
6.) Type in http://www.blackra1n.com and then tap “Add Source“.

7.) Now tap on the “Done” button in the top right corner of the screen.
8.) Tap on “blackra1n” from the “Sources” List under the “Manage” tab.

9.) Select “blacksn0w” from the list of packages and then tap “Install” in the top right corner of the screen and then tap “Confirm“.

10.) After the unlock is installed, tap on “Return to Cydia“. Your iPhone is now unlocked.
--------------------------------------------------------------------------------------
The following is how to Jailbreak and Unlock the iPhone 2G on 3.1.2 Firmware
1.) Plug your iPhone into iTunes, do a backup and then click “Update” to install firmware 3.1.2. After the update, eject your iPhone from iTunes using the “eject” button and close iTunes. Leave your iPhone connected to your computer.
2.) Click on the appropriate link for PC or MAC and download Blackra1n. Save the file to your computer desktop.
3.) Locate the downloaded file “Blackra1n” and double-click on it. Then click on the "Make it Ra1n" button.

4.) Your iPhone will now enter into Recovery Mode. If iTunes opens, simply close it.


5.) After the reboot, Blackra1n will indicate that your iPhone has been jailbroken. Click “OK”. You can also close Blackra1n now if it is still open.
6.) Once at your iPhone home-screen, go to Settings > WiFi and turn on WiFi.
7.) On your iPhone home-screen, you will see a new Blackra1n icon. Tap on it.

8.) When Blackra1n opens, tap on Cydia (or Rock) and tap “Install” in the top right corner.
9.) Cydia (or Rock) will now be visible on your iPhone home-screen. Your iPhone is now Jailbroken.
How to Unlock the iPhone 2G
1.) On your iPhone home-screen, tap on the Blackra1n icon.
2.) In the Blackra1n app, tap on “Cydia” to install Cydia. (If you already installed Cydia, move to Step 3)

3.) Cydia will prompt you for updates. Tap on “Complete Upgrade” and install them all.
4.) In Cydia, search for the app “BootNeuter” and install the app.
5.) Open BootNeuter and make sure the settings match the image below:

6.) When the settings match the above image, tap on “Flash” in the top right corner. The iPhone 2G will now be unlocked.
Note: You may go back into the Blackra1n app on your home-screen and use the Uninstall toggle to remove the Blackra1n app from your home-screen. This does not affect the jailbreak or unlock.
--------------------------------------------------------------------------------------
The following is how to Jailbreak the iPod Touch on 3.1.2 Firmware
1.) Plug your iPod Touch into iTunes, do a backup and then click “Update” to install firmware 3.1.2. After the update, eject your iPod Touch from iTunes using the “eject” button and close iTunes. Leave your iPod Touch connected to your computer.
2.) Click on the appropriate link for PC or MAC and download Blackra1n. Save the file to your computer desktop.
3.) Locate the downloaded file “Blackra1n” and double-click on it. Click on the "Make it Ra1n" button.

4.) Your iPod Touch will now enter into Recovery Mode. If iTunes opens, simply close it.
5.) After the reboot, Blackra1n will indicate the your iPod Touch has been jailbroken. Click “OK”. You can also close Blackra1n now if it is still open.
6.) Once at your iPod Touch home-screen, go to Settings > WiFi and turn on WiFi.
7.) On your iPod Touch home-screen, you will see a new Blackra1n icon. Tap on it.
8.) When Blackra1n opens, tap on Cydia (or Rock) and tap “Install” in the top right corner.
9.) Cydia (or Rock) will now be visible on your iPod Touch home-screen. Your iPhone is now Jailbroken.
Note: You may go back into the Blackra1n app on your home-screen and use the Uninstall toggle to remove the Blackra1n app from your home-screen. This does not affect the jailbreak.
--------------------------------------------------------------------------------------
The following is how to Revert Your iPhone 2G/3G/3GS or iPod Touch Back To “Normal”
1.) Open iTunes and plug your iPhone 2G/3G/3GS or iPod Touch in via the USB. Backup your iPhone/iPod Touch if iTunes allows you to.
2.) When iTunes recognizes the iPhone/iPod Touch, click on the “Restore” button in iTunes. This will restore your iPhone/iPod Touch with fresh 3.1.2 firmware.
3.) After the restore is complete, iTunes will prompt you to Set up a New Device or Restore from Back Up from an existing backup (the backup from step 1). Choose which ever method you want and let iTunes process.
4.) After the processing is complete, your iPhone/iPod Touch will be loaded with the fresh 3.1.2 firmware or loaded with your back up that you may have chosen.
5.) Eject the iPhone/iPod Touch from iTunes using the “eject” button and disconnect the USB cable from the iPhone/iPod Touch. Turn the iPhone/iPod Touch off and then turn the iPhone/iPod Touch back on.
Use Bonus Code: TGiPJB for 100% up to $100 on 1st Deposit
- The methods listed below can be followed on BOTH PC and Mac users.
- Your iPhone/iPod Touch must be updated to firmware 3.1.2 via iTunes before beginning this process.
- For users that already have a jailbroken device and want to keep their jailbroken apps, before you begin the process below, download “AptBackup” from Cydia and back up your jailbroken apps. Now connect your device to iTunes and backup your device using the iTunes backup process. After you do the jailbreak process below, redownload AptBackup from Cydia and plug your device into your computer. Using AptBackup, restore your apps.
- If you are already jailbroken and/or unlocked and have problems with WiFi, GPS or Youtube, click here.
The following is how to Jailbreak and Unlock the iPhone 3G/3GS on 3.1.2 Firmware
1.) Plug your iPhone into iTunes, do a backup and then click “Update” to install firmware 3.1.2. After the update, eject your iPhone from iTunes using the “eject” button and close iTunes. Leave your iPhone connected to your computer.
2.) Click on the PC or Mac links to download Blackra1n for PC or MAC. Save the file to your computer desktop.
3.) Locate the downloaded file “Blackra1n” and double-click on it. Click on "Make it ra1n" to launch the tool.

4.) Your iPhone will now enter into Recovery Mode. If iTunes opens, simply close it.


5.) After the reboot, Blackra1n will indicate that your iPhone has been jailbroken. Click “OK”. You can also close Blackra1n now if it is still open.
6.) Once at your iPhone home-screen, go to Settings > WiFi and turn on WiFi.
7.) On your iPhone home-screen, you will see a new Blackra1n icon. Tap on it.

8.) When Blackra1n opens, tap on Cydia (or Rock) and tap “Install” in the top right corner.
9.) Cydia (or Rock) will now be visible on your iPhone home-screen. Your iPhone is now Jailbroken.
How to Unlock the iPhone 3G/3GS
1.) On your iPhone home-screen, tap on the Blackra1n icon.
2.) In the Blackra1n app, tap on “Sn0w”. Your iPhone will now be unlocked.

Note: You may go back into the Blackra1n app on your home-screen and use the Uninstall toggle to remove the Blackra1n app from your home-screen. This does not affect the jailbreak or unlock.
---------------------------------------------------------------------------------
The following is how to Unlock the iPhone 3G/3GS if you are already Jailbroken and running Baseband 05.11.07
1.) On your iPhone home-screen, tap on the Cydia icon.
2.) If Cydia prompts you for updates, install them all.
3.) In Cydia, tap on the “Manage” tab at the bottom.

4.) Tap on the “Sources” button.
5.) Tap on the “Edit” button in the top right corner of the screen and then tap the “Add” button in the top left corner.
6.) Type in http://www.blackra1n.com and then tap “Add Source“.

7.) Now tap on the “Done” button in the top right corner of the screen.
8.) Tap on “blackra1n” from the “Sources” List under the “Manage” tab.

9.) Select “blacksn0w” from the list of packages and then tap “Install” in the top right corner of the screen and then tap “Confirm“.

10.) After the unlock is installed, tap on “Return to Cydia“. Your iPhone is now unlocked.
--------------------------------------------------------------------------------------
The following is how to Jailbreak and Unlock the iPhone 2G on 3.1.2 Firmware
1.) Plug your iPhone into iTunes, do a backup and then click “Update” to install firmware 3.1.2. After the update, eject your iPhone from iTunes using the “eject” button and close iTunes. Leave your iPhone connected to your computer.
2.) Click on the appropriate link for PC or MAC and download Blackra1n. Save the file to your computer desktop.
3.) Locate the downloaded file “Blackra1n” and double-click on it. Then click on the "Make it Ra1n" button.

4.) Your iPhone will now enter into Recovery Mode. If iTunes opens, simply close it.


5.) After the reboot, Blackra1n will indicate that your iPhone has been jailbroken. Click “OK”. You can also close Blackra1n now if it is still open.
6.) Once at your iPhone home-screen, go to Settings > WiFi and turn on WiFi.
7.) On your iPhone home-screen, you will see a new Blackra1n icon. Tap on it.

8.) When Blackra1n opens, tap on Cydia (or Rock) and tap “Install” in the top right corner.
9.) Cydia (or Rock) will now be visible on your iPhone home-screen. Your iPhone is now Jailbroken.
How to Unlock the iPhone 2G
1.) On your iPhone home-screen, tap on the Blackra1n icon.
2.) In the Blackra1n app, tap on “Cydia” to install Cydia. (If you already installed Cydia, move to Step 3)

3.) Cydia will prompt you for updates. Tap on “Complete Upgrade” and install them all.
4.) In Cydia, search for the app “BootNeuter” and install the app.
5.) Open BootNeuter and make sure the settings match the image below:

6.) When the settings match the above image, tap on “Flash” in the top right corner. The iPhone 2G will now be unlocked.
Note: You may go back into the Blackra1n app on your home-screen and use the Uninstall toggle to remove the Blackra1n app from your home-screen. This does not affect the jailbreak or unlock.
--------------------------------------------------------------------------------------
The following is how to Jailbreak the iPod Touch on 3.1.2 Firmware
1.) Plug your iPod Touch into iTunes, do a backup and then click “Update” to install firmware 3.1.2. After the update, eject your iPod Touch from iTunes using the “eject” button and close iTunes. Leave your iPod Touch connected to your computer.
2.) Click on the appropriate link for PC or MAC and download Blackra1n. Save the file to your computer desktop.
3.) Locate the downloaded file “Blackra1n” and double-click on it. Click on the "Make it Ra1n" button.
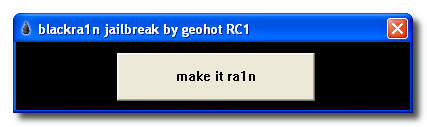
4.) Your iPod Touch will now enter into Recovery Mode. If iTunes opens, simply close it.
5.) After the reboot, Blackra1n will indicate the your iPod Touch has been jailbroken. Click “OK”. You can also close Blackra1n now if it is still open.
6.) Once at your iPod Touch home-screen, go to Settings > WiFi and turn on WiFi.
7.) On your iPod Touch home-screen, you will see a new Blackra1n icon. Tap on it.
8.) When Blackra1n opens, tap on Cydia (or Rock) and tap “Install” in the top right corner.
9.) Cydia (or Rock) will now be visible on your iPod Touch home-screen. Your iPhone is now Jailbroken.
Note: You may go back into the Blackra1n app on your home-screen and use the Uninstall toggle to remove the Blackra1n app from your home-screen. This does not affect the jailbreak.
--------------------------------------------------------------------------------------
The following is how to Revert Your iPhone 2G/3G/3GS or iPod Touch Back To “Normal”
1.) Open iTunes and plug your iPhone 2G/3G/3GS or iPod Touch in via the USB. Backup your iPhone/iPod Touch if iTunes allows you to.
2.) When iTunes recognizes the iPhone/iPod Touch, click on the “Restore” button in iTunes. This will restore your iPhone/iPod Touch with fresh 3.1.2 firmware.
3.) After the restore is complete, iTunes will prompt you to Set up a New Device or Restore from Back Up from an existing backup (the backup from step 1). Choose which ever method you want and let iTunes process.
4.) After the processing is complete, your iPhone/iPod Touch will be loaded with the fresh 3.1.2 firmware or loaded with your back up that you may have chosen.
5.) Eject the iPhone/iPod Touch from iTunes using the “eject” button and disconnect the USB cable from the iPhone/iPod Touch. Turn the iPhone/iPod Touch off and then turn the iPhone/iPod Touch back on.
Use Bonus Code: TGiPJB for 100% up to $100 on 1st Deposit
blackra1n
blackra1n is an unlock / jailbreaking tool for Mac and PC users alike. This is not a dev-team release but some users are reporting success with this new tool. For more information about blackra1n the link has been added in the trusted link section on the right, or you can follow the links below:
Click here for PC users
Click here for MAC users

Use Bonus Code: TGiPJB for 100% up to $100 on 1st Deposit
Click here for MAC users

Use Bonus Code: TGiPJB for 100% up to $100 on 1st Deposit
Sunday, February 1, 2009

Friday, January 30, 2009
**UPDATE** 2.2.1 Firmware Jailbreak
From our friends the iPhone DEV-TEAM:
Close the stable door!

iPod Touch 1G (Original iPod Touch)
Update to 2.2.1 with iTunes and run QuickPwn.
iPod Touch 2G (New iPod Touch)
Sorry, no support at this time, but Redsn0w is being actively researched and developed.
Stay iTuned for more....


Close the stable door!
This is the low down on our tools for use with the 2.2.1 firmare from Apple, read the whole post in full before attempting anything. Please note that the Windows version of QuickPwn has been updated to version 2.2.5-2
- GOLDEN RULE: If you have a 3G iPhone running 2.2 firmware and you want to keep your ability to use yellowns0w (or the option to use it in the future) do NOT use QuickPwn, and do not use the official ipsw or the iTunes update process without using PwnageTool.
- Yellowsn0w will NOT work with the baseband version (02.30.03) that is present in the recent 2.2.1 update. If you want to use Yellownsn0w you will need to create and restore using a custom .ipsw that will allow you to update safely to 2.2.1 without applying the 02.30.03 baseband update. You’ll then have a 3G iPhone running 2.2.1 with an older baseband version that is still vulnerable to yellowsn0w, following these steps ensures that yellowsn0w will still operate.
- Please read all parts of this post before downloading and using these tools.
- Read items 1, 2 and 3 again and again.
- At the bottom of this post are the bittorrent files for the latest versions of PwnageTool and QuickPwn.
- These apps are suitable for the recent 2.2.1 release.
- The Yellowsn0w version has been updated to 0.9.7. Yellowsn0w is available from Cydia or Installer - this version allows compatibility with pwned 2.2.1 system (not baseband). Again„ remember 0.9.7 yellowsn0w DOES NOT WORK WITH 2.2.1 (02.30.03) directly - you need to be running a ‘pwned’ version of 2.2.1 which didn’t upgrade the baseband during the restore/upgrade.
- Users of OS X 10.5.6 will be unable to use DFU mode correctly, please see the note towards the end of this post to easily fix this issue.
Baseband 101
The ‘baseband’ is the generic name given to the internal components of the iPhone that handle the phone calls and Internet access. This ‘baseband’ is a tiny and unique independent computer system that runs inside your iPhone, it is separate to the main system that handles the applications (such as email and google maps) and it talks to the main part of the phone over an internal communications network. Think of it like a cable modem or other peripheral that is attached to your home PC that needs occasional updates. When a software update is released and presented to you within iTunes the baseband is sometimes updated (to fix bugs or add new features). The 2.2.1 update for the iPhone 3G contains such an update, so running the vanilla updater straight away with iTunes will reprogram and update the baseband. This could be bad for certain people, depending on your ultimate aim.
SIM Free/SP Unlocked/Factory Unlocked iPhone 3G
This applies if you bought your iPhone 3G for $$$$$$$. This model of iPhone 3G doesn’t have an Service Provider lock (aka factory unlocked) and you are able to put any SIM card into the phone and get service. Your phone is already unlocked so you do not need to worry about baseband updates, simply upgrade to 2.2.1 using iTunes and then use QuickPwn to Pwn and Jailbreak. This will add Cydia and Installer too.
Locked iPhone 3G - Preserve Baseband
This applies if you have a locked iPhone 3G and you wish to update to 2.2.1 but preserve the iPhone’s current baseband software. Preserving the baseband will ensure that you can still use “yellowsn0w” the iPhone 3G unlock application. To upgrade your phone to 2.2.1 and preserve the state of the baseband you need to create a custom .ipsw with PwnageTool. This custom .ipsw will not contain the baseband update but of course will still give you any new stuff from 2.2.1
There are plenty of tutorials about this process on the web, but PwnageTool contains intuitive graphics and easy to follow prompts that should have you up and running in no time at all. Please note: PwnageTool is only available for Mac OS X.
Locked iPhone 3G
If you are using your iPhone with one carrier and have no interest in the possibility of an iPhone 3G unlock in the near future then just restore or upgrade to 2.2.1 using iTunes and use QuickPwn to Jailbreak and add Cydia and Installer.
iPhone 2G (1st Generation)
Update or Restore your iPhone 2G with iTunes then run QuickPwn to do the magic, ‘nuff said, you don’t need to worry about anything.
iPod Touch 1G (Original iPod Touch)
Update to 2.2.1 with iTunes and run QuickPwn.
iPod Touch 2G (New iPod Touch)
Sorry, no support at this time, but Redsn0w is being actively researched and developed.
Fixing DFU mode on 10.5.6
As noted previously OS X 10.5.6 introduced a bug that affected the use of DFU mode. with some Macs. There have been previously published hacks and techniques to fix this, but here is another method that can be used to temporarily restore DFU functionality in order to use QuickPwn or PwnageTool.
- You will need an account with ADC (Apple Developer Connection) this is free and takes a few minutes to sign up, you should read the terms and conditions carefully and you should only sign up if you are thinking of developing applications in the future - http://developer.apple.com/mac/
- Download the disk image “IOUSBFamily-315.4-log.dmg” for Mac OS X 10.5.5 Build 9F33” (yes, that is a “5” in 10.5.5 - this is a developer debug package of the USB kernel extension).
- Unplug non-vital USB equipment, such as external DVD writers, USB scanners, USB mass storage devices, at the most leave a Keyboard and Mouse connected.
- Install IOUSBFamily-315.4.1.pkg from within the disk image
- Reboot your system!
- Perform necessary DFU activity with QuickPwn or PwnageTool.
- Download the disk image “IOUSBFamily-327.4.0-log.dmg” for Mac OS X 10.5.6 Build 9G55”
- Intall IOUSBFamily-327.4.0.pkg from within the disk image
- Reboot your system!
- Reattach your USB peripherals.
Official Bittorrent Releases -
- PwnageTool 2.2.5 for Mac OSX is here SHA1 Sum - 8fe2f20c00f48b37d8262d6872a12166c6e165ba
- QuickPwn 2.2.5 for Mac OSX is here SHA1 Sum - 2f1353242ef10dc408e95786643e497fcd04e4ea
QuickPwn 2.2.5 for Windows is here SHA1 Sum - <release deleted use 2.2.5-2 instead>
QuickPwn 2.2.5-2 for Windows is here SHA1 Sum - 82aae63218316af42e4fa20f8c69d9eb4fe9d4ee
Unofficial Mirrors
The following links are unofficial download mirrors, you download these at your own risk, we accept no responsibility if your computer explodes or if it becomes part of a NASA attacking botnet or even worse if your hands fall off mid-way during the use of these archives. We do not check these links or archives and we accept no responsibility with regard to the validity of the files, or with other content these links provide or with the content that is on the linked site. Always check the published SHA1 sums. We would prefer that you downloaded the official bittorrent release that is linked above, but you are welcome to try these if you really must. Mirror owners should email direct links only to blog@iphone-dev.org , please don’t place mirrors in the comments as they will be deleted.
Mac PwnageTool
- http://iphone-dev.fgv6.net/PwnageTool_2.2.5.dmg
- http://iphone.schwarzmetall.cn/PwnageTool_2.2.5.dmg
- http://rabstalk.bplaced.net/mirrors/PwnageTool_2.2.5.dmg
- http://jmcoon.net/PwnageTool_2.2.5.dmg
- http://downloads2.ipod.backshot.eu/PwnageTool_2.2.5.dmg
- http://www.iphone-storage.de/PwnageTool_2.2.5.dmg
- http://miphone.ca/iphone-dev/PwnageTool_2.2.5.dmg
Mac QuickPwn
- http://iphone-dev.fgv6.net/QuickPwn_2.2.5.dmg
- http://iphone.schwarzmetall.cn/QuickPwn_2.2.5.dmg
- http://rabstalk.bplaced.net/mirrors/QuickPwn_2.2.5.dmg
- http://jmcoon.net/QuickPwn_2.2.5.dmg
- http://www.iphone-storage.de/QuickPwn_2.2.5.dmg
- http://downloads2.ipod.backshot.eu/QuickPwn_2.2.5.dmg
- http://miphone.ca/iphone-dev/QuickPwn_2.2.5.dmg
Windows QuickPwn
- http://miphone.ca/iphone-dev/QuickPwn225-2.zip
- http://foskarulla.com/QuickPwn-225-2.zip
- http://downloads2.touch-mania.com/QuickPwn-225-2.zip
- http://www.applei.ph/devteam/QuickPwn-225-2.zip
- http://phonenews.com/phones/gsm/apple/QuickPwn225-2.zip
- http://rabstalk.bplaced.net/mirrors/QuickPwn-225-2.zip
- http://www.evil-crew.de/QuickPwn-225-2.zip
- http://daniel14.com/QuickPwn-225-2.zip
Stay iTuned for more....

Subscribe to:
Posts (Atom)