Now the fun begins!
Want those cracked games and applications you have been dying to get on your iPhone, read on....
Step 1
Connect your iDevice to your PC, launch iTunes and download any free application to your iPhone from the App Store.
Step 2
Go to this link and download the MobileInstallation 2.2 file or copy and paste the following link into a new browser:
http://rs422.rapidshare.com/files/166556218/MobileInstallation_2.2_by_dpi295.rar
Save the file on your PC Desktop
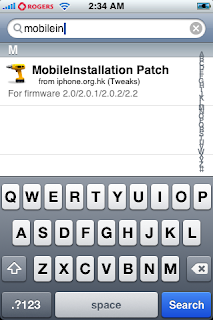
Another way to get this file in on the iPhone itself launch Cydia select Manage at the bottom of the screen, select Sources, select edit (top right hand corner), select add (top left hand corner) and add this source http://iphone.org.hk/apt/. Once added, select the new source and do a search for mobileinstallation. You will find a patch that looks like this:

Step 3
On your iPhone go to settings / general / auto-lock / never
You can change this back to your preferred setting when you are done.
Step 4
Select Toggle SSH on your iDevice and enable it
Step 5
Launch and login to WinScp
Step 6
From the WinSCP home page click back

3 times until you see the folder "system". The screen will look like this

The path I want you to take is system / library / privateframeworks / mobileinstallation.framework
Step 7
In this folder you are going to see a file by the name of MobileInstallation. This is the file you need to replace with the one you downloaded to your desktop in Step 2. Drag and drop the file from your desktop to WinSCP. You will get a message asking if you want to copy MobileInstallation, select yes. You may also get a message asking if you want to "Override", select yes. The file is now replaced.
Step 8
In WinSCP right click on MobileInstallation and go to properties. Change the permissions to 0775 as illustrated below:

Click back once so you can see the mobileinstallation.framework folder. Right click on the folder and go to properties. Change the permissions here to 0755 as well and check the box for "Set Group, Owner and Permissions recursively" as shown below:

Step 9
Power cycle your iDevice
Congratulations!! You iPhone is now enabled to read .ipa files!!!!!!
So let's put an .ipa on your iPhone:
Step 1
iTunes should already be launched so take your .ipa file and drag and drop it to the iTunes application area. Give it time to populate. When it is done you will see the .ipa icon on the screen just like the screenshot below:

Step 2
Click on Sync and your done!
Have fun with your .ipa's and stay iTuned for more iPhone updates, tips and tricks to take full advantage of you iDevice!!!


Mobileinstallation Patch for 2.2.1 is out. Follow same instructions but use the new patch
ReplyDelete